Monday, November 12, 2012

3D Etched Metal House Necklace

Its three weeks since I had the second operation on my shoulder and all going well. Of course there is still some post operative pain but the awful pain I was getting with stretching out to get anything has now gone...range of movement is improving slowly too so all in all not too bad. My gorgeous daughter Melissa was home last week for a visit and left Friday...I miss her already. I was cleaning up my desk yesterday after her visit and a WIP just called to be completed
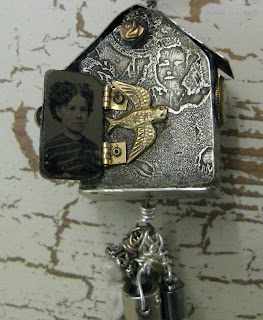
See I had a nearly completed 3D tiny etched metal house on my desk for months and on it were some vintage children images...it got me wondering If they did live in that tiny house what would they play with and what treasure may be found that they have left behind?. I gathered a few things that reminded me of things kids played with or that where needed in that tiny house and attached them on the bottom. I then got stuck getting the roof to stay on....finally with some hints by Jen Crossley (holding my tongue to the right really helped Jen LOL) I got the roof on eventually and the little house that Annette built was made :o). House is 4cm tall, 3cm wide and sides are 1.5cm wide.


 On the back side under the door is a tin type photo of a boy and the keys to the house


 and under the other door is a tin type photo of a girl and a brass bird. He has a broken beak which I actually liked for some odd reason


On both sides there is tiny ice resined ,vintage children in tiny bezels.


 A closer look at the dangles. The frozen Charlotte doll is so small at 2,5cm long...I was worried I would break her if I tried to drill a hole in her so I "glued" her head into a bead cap with Ice Resin...she looks like a gumnut baby!!


I think I'll darken the wire that I used on the dangles with some black patina for solder but other then that I think its all done and ready to be worn.
hugs
Annette In Oz

Friday, November 2, 2012

Steampunk Adjustable Rings And A Card

I had my second shoulder operation this year a week and a half ago. Post op I struggled a bit for the first few days due to some swelling that was hindering my ability to do the Physio exercises. Once the swelling went down I have dedicated myself to the Physio exercises with in pain limits. I still can't get full range of movement yet but I think its slowly improving. Before this last operation I did allot of house work and also made a few things. My daughter Melissa comes home for a week on Saturday so yesterday I tidied the spare room which is also my art space and found a few things to share with you. First is a steam punkish birthday card for eldest daughter Carlia's boyfriend Cory.


Then I found two almost completed adjustable brass rings. They only needed a rivet to attach the top part to the ring which I did easily with my handy rivet/eyelet tool I got from Jen Crossley's shop. The left ring has a vintage typewriter key and the right a lovely metal rose embedded in Ice Resin.


I've also uncovered an almost complete 3D etched, metal, house necklace, my 3D metal house (etched but not put together) and three puffy hearts awaiting transformation...all a great inspiration to go do more Physio  exercises so I can get the strength back in my arm to get them done!!
hugs
Annette In Oz

Sunday, October 21, 2012

Zipper Bracelet

I was blog surfing here and came across this tutorial to share. I have 2 daughters in their early twenties and just thought this would be fun to make for them...


Now I must    get   away   from   the   computer NNNOOOOWWW and get some stuff done. Operation tomorrow YICKS!!!!
hugs
Annette In Oz xxx

Saturday, October 20, 2012

Gorgeous Glass

I've been still madly getting things done pre operation on Monday and I am fast running out of time. I haven't had a chance to post about my glorious glass necklace and ear ring making day( I was supposed to be cleaning up the art desk and got hopelessly side tracked making stuff). As I said most of the lamp worked glass beads and all the dichro items were made by my talented friend from Tasmania  Gail Hart . Gail has patiently taught the basics of lamp work bead making and I am still trying every few days to replicate what she has taught me. They are getting rounder but are still mainly crap LOL. I'm sort of ok at spacer beads so even though I have used mainly Gail's glass work allot of the spacers are made by me. I having allot of trouble with finding a good height for the torch so my stupid left shoulder wont complain. Hopefully after operation on Monday that problem will be solved too.
Allot of the beads and some of the dichro items I have from Gail and used in my making fest are not her "gallery" quality BUT I still love them all and had fun playing with them.....no cringing Gail Ok ?  Sorry some images are a little blurry too I have a natural shake in my hands which gets worse when I concentrate.

This gorgeous hollow red and white lentil bead is huge(approx 4cm in diameter) yet lite as its hollow.


Another large lentil in blue,white and black colours. The blue parts are far deeper in colour IRL.

When I was trying to clean up and put stuff away I came across two large tear drop shaped stones. I think I'll give one of these each to my girls. The beads at the top have lovely soft purple and greens in them.


The green one I had a whoops moment with as I should have put the brighter green spacers closest to the green stone but I had already crimped the closer and can't get it off. ALSO I don't like the brass toned jump ring so shall change that to dark silver or gun metal grey when I can get to Spotlight to get some next. I've ordered some more vynil covered necklaces so when they come I'll fix it and attach it to a new necklace.


This huge 4cm long hollow heart is really more red brown IRL...I am so in need of a new camera.


I LAURVE the coral colour on the lime green of this solid heart


HHHmmm the spacers are too large for this little heart. I'm thinking it will get fixed too and maybe turned into a dangle for a charm bracelet instead.


Gail makes the most amusing fish beads. They of course all turn out differently and have some funny "expressions"


And cute cup cakes. You can't see it in the photo well but there are clear pink "sprinkles" on the top.


Some of Gail' dichro rejects. Photos NEVER do shimmer justice but these shimmer like all heck depending on how the light hits them. See that centre on how it looks black...it isn't it has the most gorgeous blue/purple shimmer when light falls on it...see the image below this one where I picked it up.


These large approx 4cm square dichros are some of my favourite made by Gail.


I still have loads of spacers so made a few ear rings as well.


So there you go...not gallery quality at all but Annette quality is fine by me *grin*. I'm off to bury myself in the trying to tidy my art room more...wish me luck with not getting further distracted LOL.

OH before I forget...I am not very good with promoting myself but when I upload stuff here I also load an image in which ever page tab it goes in (at top of my blog) they belong too and YES I do sell stuff so if you are interested just ask me the price. In the jewellery tab I also will say underneath in red if the item is sold :o)

hugs
Annette In Oz

Wednesday, October 17, 2012

Wire Weaving

Hi all
I have to have another shoulder operation next Monday so I have been doing a big house clean...you know the type where you pull the furniture out and rediscover something from Christmas last year hiding there LOL. I'm up to the art room now...there is stuff everywhere on the spare bed, desk and tops of cupboards. Problem is as I put stuff away I get easily side tracked easily and start making things and in so doing create more mess LOL. In amongst one part of the stash, I found a wire woven rock that I started in Mary Hettmansperger's class. It was only 1/4 done...so off I went and merrily finished it...then took a photo only to realize I had stopped doing the correct wire weaving technique...you are meant to go over and then under the wire but I went under and then over!! Here is the wrong way to do it:

Then last night I decided to try again on a different rock and got a bit better of a result. I hit some trouble when I ran out of the bright red wire and started using a darker shade as I couldn't see it as easily as the bright red (combination of me needing new glasses and having horrid wall mounted oyster lights in the house...its like having candles on  !!). Anywho here is the red wire woven rock:


Today I did some general house work and then went to clean the art room some more and got hugely distracted with hand made glass beads and dichro cabs.....most are made by the ubber talented glass artist Gail Hart although allot of the glass spacers were made by me. I think I made 15 necklaces and 2 pairs of ear rings and still have loads left over. I shall load them up tomorrow as I have to scoot to work soon. I'm not looking forward to this other surgery but I am hoping it frees my shoulder up and reduces the pain once its healed again. Grant will be home for 4 days from next Thursday and I can't wait :o).
hugs
Annette In Oz xxx

Saturday, September 22, 2012

Mary Hettmansperger's Class

AARRRGGG not feeling well at all today...I think I got a bit run down during classes with the awesome inspiring Mary Hettmansperger. At the time I also had a badly infected thumb and had to go and see a Dr after the first day of classes to get some antibiotics. Its likely to have helped with the run down feeling and was a great hindrance for me in doing stuff in class. Just hurt too much to apply any great pressure or pick tiny things up with. I did (with Mary's OK of course) take photos of Mary's work of what we were taught and took lots of notes so I would have a reference back too, to see what we did. I'll share some of the photos I took with you as well. OK so here is a pile of some metal samples made in class.


We learnt how to use the flame, air and quenching to colour copper. Just love the effect!!


The next few were flame coloured and stamped (yeha...I knew there had to be a use for my stamps). The first one was done on brass and the others are done on copper.


Next sample was done using the flame in a different way to get orange and red colours. We used stamps or paint brushed patterns on the metal.


These next samples were done with stamps, embossing powders and heat to create textures and patterns. I have a draw full of embossing powders too so something else in my stash I now know I can use on metal.


 Flame coloured, stamped and embossed on both of these but I over heated the one on the right..it sort of looked bleached then.


 We were taught to apply texture with a texture hammer...this one was done onto nickle silver.


 AT LAST I now know how to use enamel powders...well sample at left is how NOT to use them and sample right came out just right.


 Look out guys we were burning balls left right and centre LOL


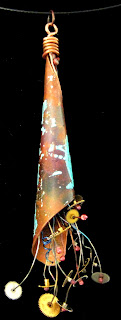
We also learnt hammering to make paddle style widened ends on wire, flatten balls of wire and wire weaving. I did try the weaving but haven't found the sample yet as I have only half unpacked my stuff. When I locate some more things I'll put them here too :o). Mary showed us how to make pods and conical forms which was another thing I had wanted to know. Here are some of my conical ones...got some cogs on two of course.

On the first two the texture was created with coloured pencils over hammered areas.


Here are two with cogs on my burnt balls *grin*.


A better look at my enamel effort. Mary showed us how to mount stuff and make bezels!!


From here on the photos are ALL of Mary's own work. I bought this one from Mary as it has some wire work inside that she showed us how to do.


See that paddle effect on the central wire on the apple piece?. That's what Mary showed us how to do.


 Hammered balls on this one...I feel a bit cheeky every time I say something like that LOL.


More paddles and pencil colour on this one of Mary's.

 I REALLY liked this pencil and domed one she made.


One of Mary's pods.


One piece showing one of the types of wire weaving we were shown how to do.


As you can see there was allot of flame work going on and by the end of three days I was TOTALLY at home with flame work so much so I went straight to Bunning's when class ended and bought a torch the same as the ones we were using in class :o).

Mary thank you, thank you, thank you so much for coming to Darwin and showing/teaching us techniques...you were totally awesome and I will be doing more classes with you when next you visit from the USA for sure. Also a huge thanks to Warren and Estelle Virgen...it was their studio the classes were held in....you two are amazing hosts and next time I wont bring my own food as the smells from the food you both cooked, drove my senses nuts!!! The classes were made even more awesome due to the lovely ladies...my fellow students with whom I did the class with as well.

I still can't believe it was a domino of circumstances that led me to do classes at all. Thank you Christine Atkins for telling me about Estelle and Warren...kicking myself that they have lived only a suburb away for the whole time I have lived here and I didn't know. They are artists themselves and host international tutors each year. I did Google them at the time Chris told me about them but mainly got papers they had been published in only... till Jen Crossley my original mentor, friend and inspiring person all round told me about Fibre Arts Australia and mentioned I may enjoy classes coming to Darwin being taught by Mary Hettmansperger...I go to their website to see and there is the connection to Estelle and Warren and the last Domino fell in place that led me to classes with Mary and my feet at Estelle and Warren's door. Their son lives four blocks up from me. Oh and on the studio wall I spied Warren's sculpture he made in Christine's class...I recognized her influence or its likely origin as soon as I entered the door to the studio LOL.


Hugs
Annette In Oz xxx
LinkWithin

Related Posts Plugin for WordPress, Blogger...