Most of the time I don't think anyone "sees" me or what I do. I'm far away up here at the top part of Australia just creating and enjoying making things. I'll put what I make here and on Facebook more as a record for me then anything. I'm genuinly amazed when people do comment positively about the things I make or when people ask to buy my handmade jewellery. So it was a HUGE surprise and honor to find iceresin.com had done a post about two pieces of my jewellery this morning. Thankyou so much. This has made my day.
hugs
Annette In Oz

Saturday, April 28, 2012


Wednesday, April 25, 2012
More Journals from Joy Bathie's Class
Well there are some huge changes about to happen here in the little Husband family. We have lived here for 19yrs and in that time Grants job has changed from a pure reptile keeping one to a reptile and small mammal keeper. He has had some struggles with co workers too over the last few years and so I encouraged him to seek a job else where. SSSsooo Grant applied for a got a job as a reptile keeper in Adeliade zoo. He will start around the 10th of June. Tim(16) and I will pack up and leave a month after Grant during the mid term school break. There is alot to organize and my head has been swiming with how to get it all done. We will live with oldest daughter Carlia at first in Adelaide while we find a place of our own. I doubt I shall get much creating done in the mean time. I do hope to finish some etched metal projects I have on my desk before I pack the art room up tho. In just over a week I shall be doing classes with Finnabair as well and I am sssooo looking forward to that. I think not long after that I shall have to box up all me stash for the move.
Some of my friends that did Joy Bathie's mixed media journal class have sent me some pictures of their journals to share. I'm still kicking myself that we did not get a group photo of them all as everyone's was so beautiful and unique. In no particular order...here is Sharon Fozard and her journal


 Jinny Bell's journal

 and this is Joan Trigg's journal


 I had trouble taking photo of the back due to my naturally shaky hands gggrrr

 and another with Me, Joy and Trizzy

Some of my friends that did Joy Bathie's mixed media journal class have sent me some pictures of their journals to share. I'm still kicking myself that we did not get a group photo of them all as everyone's was so beautiful and unique. In no particular order...here is Sharon Fozard and her journal




This is Jinny at left and Joan on right during Joy Bathie's class

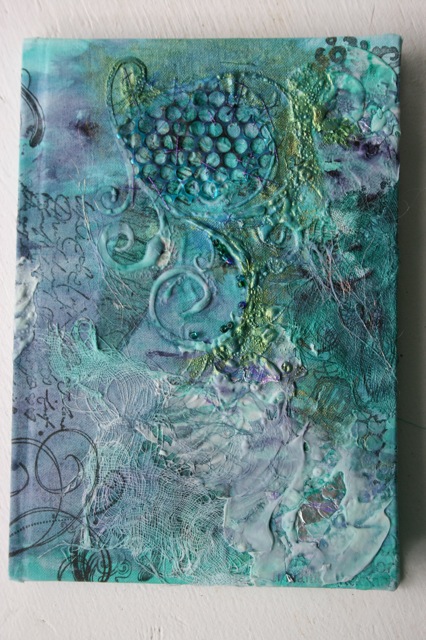
This journal was mine :o)


Here is a photo from left to right showing Joy Bathie, Teresa crouch, me and Jinny Bell


All the journals ended up turning out so textured and different and we all loved what we made so that was awesome. These ladies do not have blogs but they do have facebook accounts for you to stalk them at LOL.
It really was a great class by a great teacher and artist.
hugs
Annette In Oz...off to stress more about the BIG MOVE!!!
Friday, April 6, 2012
Retreat
2 weeks ago I had the awesome pleasure of going to Creative Inspirations Retreat organized by Trizzy(Teresa Crouch) and Vickie Deans in the Hunter Valley of New South Wales. As I was still on workers comp with this silly sore shoulder I kept the trip short but I still managed to have an awesome time. There is something special about being in a room with like minded creating types and believe me it was a room filled to the brim with 66 of us in total. Having said that we all had a whole tressle table to ourselves which was awesome. As I was flying in from little ole Humpty Doo I couldn't bring too many supplies and it was kind of fun having very limited stuff to use in the end. Also I wasn't sure my arm would tolerate too much use but my right arm did most of the work and there was no strain or stress put thru my sore arm at all phew.
Knowing some of my new found friends Jinny, Joan and Sharon were coming from New Zealand and QLD was exciting too. Trizzy and I had tried to surprise them by not letting them know I was going too but we suck at secrets and failed big time LOL. Of course also getting to see Trizzy again as well :o) was a bonus too but the clincher for me was being able to do some classes with the likes of Joy Bathie..I had wanted to meet and do classes with Joy for years...and the glitzy mist whiz Linda Baldock. from the word go there were no dramas and Triz and Vickie had everything thought of and organized to a tee.The accommodation was awesome and the meals were divine....just ask my scales when I got back home LOL. There were organized activities and competitions and just freedom to zone out of the stresses of life and connect with art and other people many of whom I knew on line or had even met before.
My first day was a class with Joy. She is so elegant, patient. and a "joy". Her work looks so layered yet seamless and ethereal. Joy had loads of hints and advice as step by step we(15 of us) built up layer upon layer to make a cover for a journal. Of course we all tried anything Joy told us about so we ended up with textured wonders rather the ethereal ones LOL but it was so fun and I adore the end result anyway. Here is the journal finished. I used the image of my Mum at 16 again. I had no glue that would glue the rusty ring down so I sewed it on. I used paints, papers, lace, decorative trim, skeleton leaves, aluminium foil, dressing gauze and much more...it started off blue as well!! Ill add a title under Mum's picture yet and send this too her.


In the evening I made two cards for two challenges. one was a sketch challenge. I had never followed sketches before as I never plan what I will make LOL. Joan gave me some gorgeous hand dyed material and I used that as the base. As i said I didn't have much with me but it still turned out Ok I think.


 and another that was a pink challenge...I'm not into pink that much so changed mine to grungy pink LOL.
 Too my amazement both cards won some prizes.Then on the second day it was classes with Linda. What a pocket rocket she is. We decorated a pizza box for this one and played with glimmer mists, killed some chip board and generally got inky.


 Trizzy even made everyone a small arty plaque!
 My last night in Syn\dney some of us went to dinner and it was one of the funniest nights I have had in a long time.My jaw was aching with laughter. from left to right is Danielle, Vickie, Jinny, Stella, Pauline, John(Joan's hubby), Joan, trizzy and Trizzy's hubby Bruce.
 and atken from the other end you can see me and Sharon on the end.
 In an instant it seemed I was back on the plane and home but I have some awesome memories of a fun filled well organized , inky fingered week end. Thankyou so much Trizzy and Vickie :o) for holding such a wonderful well organized retreat.
hugs
Knowing some of my new found friends Jinny, Joan and Sharon were coming from New Zealand and QLD was exciting too. Trizzy and I had tried to surprise them by not letting them know I was going too but we suck at secrets and failed big time LOL. Of course also getting to see Trizzy again as well :o) was a bonus too but the clincher for me was being able to do some classes with the likes of Joy Bathie..I had wanted to meet and do classes with Joy for years...and the glitzy mist whiz Linda Baldock. from the word go there were no dramas and Triz and Vickie had everything thought of and organized to a tee.The accommodation was awesome and the meals were divine....just ask my scales when I got back home LOL. There were organized activities and competitions and just freedom to zone out of the stresses of life and connect with art and other people many of whom I knew on line or had even met before.
My first day was a class with Joy. She is so elegant, patient. and a "joy". Her work looks so layered yet seamless and ethereal. Joy had loads of hints and advice as step by step we(15 of us) built up layer upon layer to make a cover for a journal. Of course we all tried anything Joy told us about so we ended up with textured wonders rather the ethereal ones LOL but it was so fun and I adore the end result anyway. Here is the journal finished. I used the image of my Mum at 16 again. I had no glue that would glue the rusty ring down so I sewed it on. I used paints, papers, lace, decorative trim, skeleton leaves, aluminium foil, dressing gauze and much more...it started off blue as well!! Ill add a title under Mum's picture yet and send this too her.


This is the back.

Here we all are in Joy's class. Joy is in the strpped shirt at the back next to Trizzy and Vickie :o)

Every one's journal turned out amazing and different and we all loved what we made. I only wish I had taken a photo of each persons end result. If you ever get to do a class with Joy go for it.In the evening I made two cards for two challenges. one was a sketch challenge. I had never followed sketches before as I never plan what I will make LOL. Joan gave me some gorgeous hand dyed material and I used that as the base. As i said I didn't have much with me but it still turned out Ok I think.


hugs
Annette In Oz
Saturday, March 31, 2012
Etching Metal Tutorial
Hi all
Kristin Hubick from Retrocafeart has asked me to do a tutorial for you all on how I etch metal after she saw my etched metal suitcase necklace from my previous post made using her small brass suitcases from her shop. Those of you who etch metal and adore doing so as I do, would know its very hard to actually etch a 3D object like a working small brass suitcase as the item being etched is floated on the etchant surface not sitting on the bottom of the tray covered in solution... so how to etch just one side and not affect other parts. I digress though...first how to etch at all.
I've never made a secret of the fact that the one and only artistic gorgeous Jen Crossley taught me hands on etching...I say "hands on" as I had read how to do it and watched YouTube how too's but learning hands on was the only way I truly KNEW how to do it....my hands are my real teacher in a class situation. Jen has given me the green light to write this too. I know I didn't necessarily have to ask her as its a technique freely available over the web but I wouldn't have done it without her consent....that's just me :o). Besides Jen has become my friend, inspiration and mentor in more ways then I can think of.
ETCHING METAL the Basics
SUPPLIES
• Metal to etch. Works with Copper, Nickel/Silver and Brass. Use .5mm (24gauge) thick sheets
• Black sharpie marker.
• Straight edged tin snips.
• Jewellers saw OR metal bench block and chasing hammer. Cover hammer flat end with leather to prevent it marking the metal.
• Hand held metal files. Also called Bastards.
• Fine Wet/Dry sandpaper.
• Stamps of choice.
• Stazon ink black. Ensure the pad is very well inked.
• Rubbing Alcohol. I use Isocol available from super markets.
• Heat gun.
• Masking tape or double sided tape and thin foam sheet.
• Disposable plastic flat bottomed containers. One small and one larger.
• Ferric Chloride Etchant solution- available at Altronics on line in Oz
• Sodium Bicarbonate powder.
• Disposable gloves, eye protecting glasses and Apron.
PROCESS
1) a-Draw shape to cut from the metal of choice with black Sharpie. Don eye wear protectors. b-Cut metal out with straight edged tin snips or use a jewellers saw. Be careful as the cut metal edges are VERY sharp. c-Hammer the cut piece flat on a metal bench block, using a chasing hammer. The metal block is also known as a chasing block. You wont have to do this if you used the jewellers saw.
 a
a
 b
b
 c
c
2) Keep eye protectors on. d-Using the hand file, file the cut metal edges. Push the file down the metal edge away from you. This makes the edges less sharp. Do both sides. Remove eye wear. e-Wet the wet/dry sand paper and sand the metal in a circular motion or go up and down and then left and right. This creates a tooth for stamping. f-Don gloves and spray some rubbing alcohol on the metal and wipe over with a soft cloth to remove sanded metal shavings and finger prints as they can interfere with the etching process.
 d
d
 e
e
 f
f
3) g-Ink stamp with a wet black Stazon ink pad and stamp image onto the sanded side of the metal. If it isn’t a good image you can wipe it back off with rubbing alcohol and redo it. Of course you can draw a design of your choice with a Sharpie and not stamp if you wish. The Sharpie and Stazon ink resist the etchant solution. Heat set the image with a heat gun. Be careful as the metal gets very hot. Leave till metal is cool again.
 g
g
4) h-You can then attach the metal to foam with double sided tape image side up or attach strips of masking tape to the back of the stamped metal. Don eye wear, gloves and Apron. Work in a well ventilated place like outside if able. Pour approx 1cm deep etchant solution into a small flat bottomed plastic container. i-Place the stamped metal attached to masking tape or the foam in the container with the image side down so that the metal is suspended by the tape or floating on top with the foam but in full contact of the etchant solution. It needs to float on the surface so the small metal particles that come off during etching can sink to the bottom away from the etched surface.
 foam with double sided tape on bottom
 h
h
 Etchant solution
 i
i
Etching time can vary depending on if you are in a colder climate. Usually it takes 40-60minutes. You can speed it up by placing the container holding the poured etchant solution in a larger container of warm water. It works quicker if you are outside on a sunny day too. To check if the etched process is done lift up a small section of the metal from the etchant bath and run a pinky on a small section. It will feel raised if ready. WASH your pinky well under running water.
6) You can do a few things here as desired...you can add inks to the etched metal, patina it by dunking it in a Liver Of Sulphate solution or use Black Patina For Solder, paint over it etc or leave it as is. Regardless of what you decide to do the next step after that is to n-sand it again so the etched metal looks shiny again and the stamped image will become more defined. You can use a fine wet/dry sand paper first and then a slightly dry coarser one. If you leave it raw lastly wipe over the metal again with Isocol. Seal with metal spray or Crystal kote or other suitable metal sealant.
 n
n

Well that's the how too so how did I etch a 3D item like these little brass perfume bottles and the brass suitcases?

It took me several days to work this out...I'd play with this or that and then leave it on my messy desk. The trick was to make a template in cardstock of the shape, draw that on a thin piece of foam(but wider then the item is) by tracing around the template with a sharpie marker. Then cut out the drawn shape making it deep enough for the item to sit in so only one surface is exposed! As a precaution I also wrapped the edges of the suitcases and perfume bottles with tape before embedding them in the foam as well.

Usually I would only use one piece of foam with double sided tape attached that I then attached the stamped metal to etch onto but this time I used three pieces...the one I embedded the 3D brass items (above) in, the backing foam in the middle to make sure the brass wasn't too heavy and the foam still floated on the surface and the smaller piece as handle.


In the base of the suitcase is a tin type image of a child, a tiny frozen charlotte and a tiny real pencil. Both
the frozen charlotte and the pencil are from Retro Cafe Art Gallery. Ice Resin was then poured on top.

Kristin Hubick from Retrocafeart has asked me to do a tutorial for you all on how I etch metal after she saw my etched metal suitcase necklace from my previous post made using her small brass suitcases from her shop. Those of you who etch metal and adore doing so as I do, would know its very hard to actually etch a 3D object like a working small brass suitcase as the item being etched is floated on the etchant surface not sitting on the bottom of the tray covered in solution... so how to etch just one side and not affect other parts. I digress though...first how to etch at all.
I've never made a secret of the fact that the one and only artistic gorgeous Jen Crossley taught me hands on etching...I say "hands on" as I had read how to do it and watched YouTube how too's but learning hands on was the only way I truly KNEW how to do it....my hands are my real teacher in a class situation. Jen has given me the green light to write this too. I know I didn't necessarily have to ask her as its a technique freely available over the web but I wouldn't have done it without her consent....that's just me :o). Besides Jen has become my friend, inspiration and mentor in more ways then I can think of.
ETCHING METAL the Basics
SUPPLIES
• Metal to etch. Works with Copper, Nickel/Silver and Brass. Use .5mm (24gauge) thick sheets
• Black sharpie marker.
• Straight edged tin snips.
• Jewellers saw OR metal bench block and chasing hammer. Cover hammer flat end with leather to prevent it marking the metal.
• Hand held metal files. Also called Bastards.
• Fine Wet/Dry sandpaper.
• Stamps of choice.
• Stazon ink black. Ensure the pad is very well inked.
• Rubbing Alcohol. I use Isocol available from super markets.
• Heat gun.
• Masking tape or double sided tape and thin foam sheet.
• Disposable plastic flat bottomed containers. One small and one larger.
• Ferric Chloride Etchant solution- available at Altronics on line in Oz
• Sodium Bicarbonate powder.
• Disposable gloves, eye protecting glasses and Apron.
PROCESS
1) a-Draw shape to cut from the metal of choice with black Sharpie. Don eye wear protectors. b-Cut metal out with straight edged tin snips or use a jewellers saw. Be careful as the cut metal edges are VERY sharp. c-Hammer the cut piece flat on a metal bench block, using a chasing hammer. The metal block is also known as a chasing block. You wont have to do this if you used the jewellers saw.
 a
a b
b c
c2) Keep eye protectors on. d-Using the hand file, file the cut metal edges. Push the file down the metal edge away from you. This makes the edges less sharp. Do both sides. Remove eye wear. e-Wet the wet/dry sand paper and sand the metal in a circular motion or go up and down and then left and right. This creates a tooth for stamping. f-Don gloves and spray some rubbing alcohol on the metal and wipe over with a soft cloth to remove sanded metal shavings and finger prints as they can interfere with the etching process.
 d
d e
e f
f3) g-Ink stamp with a wet black Stazon ink pad and stamp image onto the sanded side of the metal. If it isn’t a good image you can wipe it back off with rubbing alcohol and redo it. Of course you can draw a design of your choice with a Sharpie and not stamp if you wish. The Sharpie and Stazon ink resist the etchant solution. Heat set the image with a heat gun. Be careful as the metal gets very hot. Leave till metal is cool again.
 g
g4) h-You can then attach the metal to foam with double sided tape image side up or attach strips of masking tape to the back of the stamped metal. Don eye wear, gloves and Apron. Work in a well ventilated place like outside if able. Pour approx 1cm deep etchant solution into a small flat bottomed plastic container. i-Place the stamped metal attached to masking tape or the foam in the container with the image side down so that the metal is suspended by the tape or floating on top with the foam but in full contact of the etchant solution. It needs to float on the surface so the small metal particles that come off during etching can sink to the bottom away from the etched surface.
 foam with double sided tape on bottom
 h
h Etchant solution
 i
iEtching time can vary depending on if you are in a colder climate. Usually it takes 40-60minutes. You can speed it up by placing the container holding the poured etchant solution in a larger container of warm water. It works quicker if you are outside on a sunny day too. To check if the etched process is done lift up a small section of the metal from the etchant bath and run a pinky on a small section. It will feel raised if ready. WASH your pinky well under running water.
5) When done wear eye wear again and remove the metal from the etchant solution. Partly fill a larger disposable container with warm water that has a j-sodium bicarbonate in it. k-Wash the metal in the bi carb solution and also rub the surface with some dry bi carb powder as this neutralizes the etchant solution and stops the metal continuing to etch. Rinse off under tap and leave till dry. lPour used etchant solution into the bi carb solution. It will bubble and then settle and can now be m-disposed off safely at a dump in secure fitting glass or plastic bottles. Do not pour it down the sink.
 j
j
 k
k
 l
l
 m
m
 j
j k
k l
l m
m6) You can do a few things here as desired...you can add inks to the etched metal, patina it by dunking it in a Liver Of Sulphate solution or use Black Patina For Solder, paint over it etc or leave it as is. Regardless of what you decide to do the next step after that is to n-sand it again so the etched metal looks shiny again and the stamped image will become more defined. You can use a fine wet/dry sand paper first and then a slightly dry coarser one. If you leave it raw lastly wipe over the metal again with Isocol. Seal with metal spray or Crystal kote or other suitable metal sealant.
 n
n

It took me several days to work this out...I'd play with this or that and then leave it on my messy desk. The trick was to make a template in cardstock of the shape, draw that on a thin piece of foam(but wider then the item is) by tracing around the template with a sharpie marker. Then cut out the drawn shape making it deep enough for the item to sit in so only one surface is exposed! As a precaution I also wrapped the edges of the suitcases and perfume bottles with tape before embedding them in the foam as well.


So here they are after etching. The second suitcase I already used to make the necklace below and in the previous post. The little perfume bottles remind me of small doll shapes so I am hunting for small doll heads to hack off to use on them...so evil sounding LOL...I have tried two dolls but they are not hollow. May make a mould and try resin yet :o)


Under the door of the suitcase is an Ice Resin filled washer with a vintage image in the base.

the frozen charlotte and the pencil are from Retro Cafe Art Gallery. Ice Resin was then poured on top.

So there you have it folks etching with metal and how to do so using 3D metal objects. Have fun.
hugs
Annette In Oz
Subscribe to:
Posts (Atom)
LinkWithin
