Monday, September 8, 2014

Julatten in Far North Queensland, Australia-long post and lots of scenery photos

Hello folks. I've been trying to get this post up for three days but I was having some trouble sitting to do so as I had an operation on my knee 9 days ago....nothing scary but I was left with allot of swelling and pain and I have only been able to bend my knee and sit and type at the computer for short periods the last few days. Anywho here I am at last! 

Over a month ago a special little art doll lady arrived here in Julatten, far North Queensland, Australia. Her name is Flat Susan and she has been roaming around the World for over a year. Her adventures started when she left her home at Neet's place in England in her tiny suit case June 21 2013. Susan has been to quiet a few countries and you can read about her venture here

This is where Julatten is on the Australian map. I live up here with my husband Grant and our 18 year old son Tim. We moved here from the Northern Territory just before Christmas. Julatten is gorgeous and our home is on a hill over looking rain forest covered mountains. You can see and read more about our new house in a past post here. Julatten is part of the World Heritage listed Wet Tropics here in Oz and is very green with luscious rain forests, pristine water ways/beaches and glorious one of a kind animals, birds and plants.  


The day after Susan arrived we took her on a bush walk just ten minutes from our home. Its called the Bump Track and its 6kms long. It  was the old road from the coast up to the Atherton Tablelands where Julatten is located. There's Susan sitting on the signs at the start.


Along the track there are "Wait A While" palms. They have these long tendrils with rear facing spikes. If you brush up near then the spikes dig into your clothes and you have to "wait a while" to get them out. Susn was small enough to sit on the spikes with no problem.


About a third of the way along you come across a gorgeous Creek. It's called Robin Creek now.


At the rear there are some rocky little falls. My hubby Grant took Susan up there for a look. Below she is resting on the rocks to the left of the falls.


We had a small cyclone come thru earlier in the year and there were several trees down with large fungi growing on them. Susan thought they would make a perfect chair for herself to sit on.


3/4 of the way along there is a seat so you can rest at the scenic look out. That's the Pacific Ocean out there. The Mowbray River below winds thru sugar cane farms and has a 2-3meter salt water crocodile visible from the highway bridge which is just before the land meets the ocean in the distance.


Once we got to the bottom we drove over the bridge to show Susan the crocodile.


The nex few days Susan and I hung out in my art room. I'm making an art book with transfers in them. Susan was really interested in them and in particular this one I did using clear embossing enamels onto a skeleton leaf.


Every week I do art classes at a local gallery so Susan climbed on my easel to get a good view of a practice painting I was doing while I learn to use acrylic paints. This is a monochromatic study in reds.


On another day we went up to Mount Lewis which is also near my home. We passed this lovely bubbling creek in the rain forest and saw huge ferns and lots of moss covered logs


One evening we had this cute little visitor on the grass outside the house...its an echidna. Susan wouldn't go near it!


On the 3rd of August Susan helped Grant celebrate his birthday. She loved the Lamington Cake
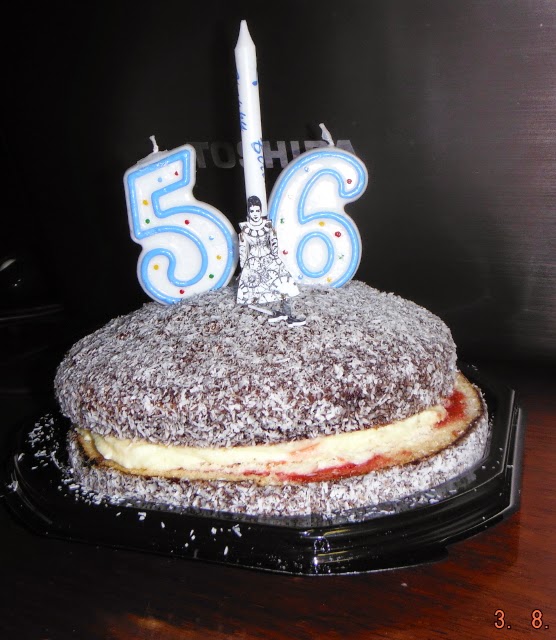

Over the next few weeks we went sight seeing and saw heaps of waterfalls, a nice island or two and some interesting prehistoric looking birds called Cassowaries....the Dad's raise the chicks!


Over at Mareeba  (35 mins from my house) there are cute rock wallabies that are a little too friendly so Susan stayed in my pocket. From there we went down the Palmerston Highway and stopped at Henrietta Creek


Another place not far from our place is Mount Carbine. There is a rugged dirt track up the mountain. We stopped at a little look out for Susan.


The road ends at the McLeod river. Susan had a rest on a log along the side of thr river...can you see her?


There she is a little closer


I carried Susan as it was a long four hour walk. This is taken near where the river drops to a gorgeous valley below


On the way back we went thru the bush so Susan could get up close to some ancient Aboriginal rock art.

It was nearing the time for me to have knee surgery so we did a last trip with Susan to Undara lava tubes which is 259kms  inland and down from Julatten.


We stopped to look at Millstream falls on the way.


We had a little wait before the lava tubes tour so we climbed to a little lookout above Unadara. Susan is hanging off the tree at left...


here she is in a closer view


The lava tubes were amazing and are the longest known in the World according to the guide. There is Grant and my son Tim as they climbed the stairs down into the lava tubes


This was the view from the top of the tube in...they are very large. The pole you can see was put there 40 years ago for scientists to assess if the tube was straining in any way that may imply an imminent collapse.


Susan stayed with Annette as it gets quite dark inside


There are arches where parts of the tube have collapsed


Susan spent her last day helping Annette make a tag for Eliza who also lives in Australia and is the next person hosting Susan


There is so much more Susan could see here and this was the tip of the ice berg...maybe she will come back. For now though she is on her way to Eliza's tucked away in her little suitcase mid air I suppose. Have fun on your adventure Susan.
hugs
Annette In Oz

Saturday, August 30, 2014

A chance to win a spot for Tracy Verdugo's painting ecourse!

Hi all. tracy Verdugo is giving away 3 spots in her up coming ecourse. Info is  Here or copy and paste artoftracyverdugo.blogspot.com.au . Tracy is an artist who teaches people to free themselves up and paint in ways they never knew they could. I hope I'm a winner in one spot but if not maybe you xxx
Hugs
Annette In Oz

Tuesday, August 12, 2014

Some Amazing Pop Up Cards in Cairns Far North Queensland

I awoke this morning to the very sad news of Robin Williams passing away...a victim of depression and suicide..a tragic loss to the arts and the World...he made me smile, think and enjoy the World and he will be so missed by me and many others. RIP Robin and my thoughts to his family. His passing crept into my mind all day...we have such a short time on this planet and lately I have been letting my art time slip so I also found myself thinking I need to do more art and share my life as I go as I have always done in the past..so here is a much awaited post and I hope there are more to come.

We are getting out and about up here in our new home in far north Queensland. I can't believe we have been here 7 and a half months already. On the week end we went to iconic Rusty's markets in Cairns...a great place to buy fresh produce and also other interesting items. While there we came across an awesome stand with pop up cards.....I have always loved pop up cards and couldn't resist buying four!


A few months ago I sent some double up books I had to an on line friend Autumn in the USA. As a thank you she sent me this gorgeous monochromatic (well almost LOL) card below...thanks so much Autumn!


I'm still struggling to find work away from nursing but I 'll keep trying. To fill in my time I'm doing weekly art classes at Douglas Art Base and we are slowly learning about acrylic paints and how to use them. I'm also doing a ten week experimental fiber arts course plus intermittently making some jewellery. There is a pebbly beach near us and I spent several hours gathering rocks to weave wire around...


It's weird as I thought being unemployed I would have loads of time to create but I seem to be busy doing nothing LOL. Well not really nothing as we have had delightful visitors after visitors here as well which has also kept me busy...visiting far north Queensland is a desired thing to do for those whom live in colder areas down South. We also are getting out and about to explore the gorgeous tropical rain forests that abound up here....there is a lovely walk near home called the Bump Track and its become a fav spot of mine. There is a divine creek along the track that I love which is below. I'll do a separate post re places we have been soon.


I also did a quick visit back to Darwin to see my daughter Carlia and our gorgeous granddaughter Ivy who is now 7 and a half months old. She is full of giggles and fun and is a very happy cruisey baby. I love her to bits


I hope to start posting more again soon and get more art and jewellery done as well. Till then....hug yr loved ones close and tell them you love them, embrace the World and its diversity and never take people for granted as like Robin they may not be there tomorrow...sigh
hugs
Annette In Oz

Wednesday, May 7, 2014

What's On Your Work desk Wednesday (WOYWW) 257

Hubby is home on his days off and we were out and about last week so I missed WOYWW. Today I am late as we spent the day driving up to Cape Tribulation-which is a World Heritage listed Wet Tropics area full of gorgeous rain forest and amazing wildlife. I'm home now and will join in the crazy phenomenon that is WOYWW where arty farty people all over the World share what is on their desks and you get to drop by and see as many you are able too. Its organized by Julia so click on the link to her blog HERE if you want to join in or know more about it.  It's close to 5 pm now but here is what is on my work desk this Wednesday.

I've been doing paper crafts again making "A Card In A Box" for my Mum and my hubby's Mum's Mothers Day this week end coming. They are on the left and the trial one in white is in the middle.


Here they are closer...the greeting goes on the back.


They fold flat for posting


but pop up once opened


They are really easy to make and there is a tutorial below here if you want to know how to make them yourself. Now I'm off to snoop on other peoples desks!
hugs
Annette In Oz

Tuesday, May 6, 2014

Card In A Box Tutorial

It's been ages since I have shared a technique but I was making some "cards in a box" for my Mum and hubby's Mum for Mother's day and thought I would share the how too. These cards fold flat for posting and once open they become a small box with pop up central areas as per below.


                         What You Need


  • A4 piece of card stock. I'm using white to  show you more easily what I am doing.
  • Pencil. I'll use a black marker in the how too so it stands out more though.
  • Rubber
  • Ruler
  • Craft knife
  • Bone scorer (or use your ruler edge or rear of your craft knife)
  • Glue or double sided tape
  • Patterned paper or images and or stamps of your choice


                        How Too

1) Place A4 card in portrait position (smaller ends at top and bottom). Measure and mark a pencil dot at 7cm and 15 cm's at top and at bottom from the left hand side. (I'm using a black marker so you can see what I am doing)

Mark a dot at 7cms and 15cms at the top

repeat at the bottom
 2) Turn card so its in landscape position (short sides at left and right). Use ruler and craft knife and cut along from one 15cm marked dot to the other. Keep this cut off bit for use later.


 3) Have card where the 15cm line is cut off now at the bottom.  Measure and mark a dot along top and bottom at 7cm intervals so at 7cms, 14cms, 21cms and 28cms. There will be a small strip left over on the right side.


4) Use image as a guide and score all broken lines and cut all solid lines. That is cut down the 7cm areas and score the 8cm long areas and score the long central part form right to first 7cm centre line. Completely cut off the top right small section where I have written "cut".


Then taper the bottom right small part. This will be the tab to make the box.  It should now look like this


 5) Fold all scored 8cm areas along their edges and use bone folder to press the edges as you go. I find it easier to do this by turning the card to the back


6) Turn it back to right side and use bone folder to press each 7cm area down


7) Apply glue to the tab at bottom right.


8) Bring tab back and glue it to the rear left edge (behind the panel at left that has no score lines on it). You may find this easier to do by turning it over again and bringing the straight edge to the tab edge. Either way it should now be a box!


9) Use the part you cut off at step 2) and cut two strips that are 2cmx10.5cms long.


10) Measure and mark dots at 2cm and 9cm along top and bottom and then score across these to create a 2cm tab and a 1.5cm tab at either end.


 Bend one tab forward and one back to make a loose "Z" shape.


11) Apply glue to rear of 2cm tab and front of 1.5cm tab on both strips.


12) Place one strip in the box just near the top so tabs stick on the box wall. 


Gently "squish" the box to check the tab is in correct  position so once decorated the box can close Ok for posting.


 Adjust tab as needed and insert second tab behind this one in the same way. Aim for tabs to be at a third and 2 thirds spots in the box. It really doesn't have to be precise though.


Now rub off any pencil dots visible and decorate the box as desired....attach images, papers or stamps etc along the box strips. Use small images on front strip and larger on rear strip. Add a greeting behind your "card in a box".


Aren't these just cool? I'm itching to do a steampunk one :o)

hugs
Annette In Oz

LinkWithin

Related Posts Plugin for WordPress, Blogger...