Wednesday, June 26, 2013

What's On Your Workbench Wednesday 213 (WOYWW)-A Big Mess LOL

I've finally got time to play in What'on Your Workbench Wednesday (WOYWW) again after me having a visit to see my Mum In Queensland and then having my daughter Carlia and her boyfriend Cory visit me for a week. If you want to join in WOYWW and share what is on your desk go here to Julia's blog.  As you can see my desk is covered in a whole lot of stuff LOL. It's mainly covered by my hand made jewellery which I am cleaning, polishing and fixing so I can post it all to another friend who shall take photos of all the items for me


Stuff at the left is cleaned and polished items and stuff to right still needs cleaning


 There are cuffs

Necklaces and rings


Quirky steam punk bezel bracelets


and even two recently made cards


Both cards were made for my weekly Tuesday share of an old tip or technique and the how to for both is below this post. So why would I want to post all my jewellery off for it to be photographed you may ask? Well you shall have to wait till next week and I shall tell you !!.
I had some cortisone injections to my sore hip and shoulder three weeks ago and had hoped it would help with my discomfort (esp at night) but the effects started to wear off after a week aaarrrgg. It just means I can't sit or do ANY activity for very long although I get things done in segments of time so I do get get SOMETHING done in the end. It all will resolve itself in the end on its own but when?.  I may have to get another lot of injections done again after I see specialist again on the 30th July (how dare he take the month of June off LOL) to help it along but for now I am a blonde, turning grey who is greatly sleep deprived so watch out World!!
Off to see other peoples desks
hugs
Annette In Ox

Mail Has Arrived!!

I'm late getting this post up as my family life has been rather busy but I've had some lovely art arrive in the mail recently that I wanted to share. First was a gorgeous collage made by Glenda that came before I went to Queensland to see my Mum. I just love the texture paste areas and that owl is so cute.


Then when I got home there were two divine ATC's waiting for me. The first one was from Roslyn. She has used the faux marbling shaving cream background

And this one was from Sandra which has lovely embossed texture and runched ribbon on it


Its so nice receiving hand made items and loved all three so thanks so much ladies :o)
hugs
Annette In Oz xxxx

Tuesday, June 25, 2013

Side Step Card How Too / Tipnique Tuesday

OOOHHH now here is another technique from my tips and technique book I had never tried myself till today. Its a side step card. There are many templates for these on the net. You can make them big or small and adjust the "steps" in height and width to meet your needs or even fold from the back so step is on other side or add another section to the right so the step is in middle. This is "my secret garden" side step card. My camera wants to focus on the front so the back is a bit blurry.


A bit better as I am holding all the steps closed which brings the rear forward.


                                     WHAT YOU NEED


  • 300gms card stock measuring 21cm by 15cm
  • Ruler, rubber, pencil, craft knife, craft mat and a bone folder

                                   HOW TOO
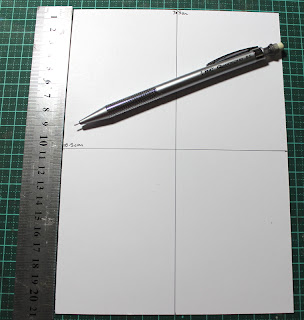
1) Place card in portrait position (longest 21cm edges at sides). Measure and mark a dot with a pencil at the half way mark on all sides. I'll use a black marker so you can see what I am doing. You should have a dot at the 10.5cm mark on the long sides and 7.5cm on the top and bottom. Lightly draw a pencil line across from each point.


2) On right hand side and on middle line measure up from bottom and mark pencil dots progressively upward at 3cm, 1.5cm, 3cm, 3cm and 4.5cm. Which will leave a 6cm area at top right. You can change these measurements but keep in mind the measurements have to equal 10.5cms at the half way point


3) On the image below I have marked which lines will be Mountain folds (M) and which are Valley folds (V). The wiggly area is where you cut with the craft knife.


Score and lines marked as M or V with ruler and bone folder


 Use craft knife and ruler to cut between the first marked line and the last marked line along the centre line.


4) Now fold the card using the bone folder to make the mountain and valley folds so you end up with a three step structure at left. Fold flat and rub out all lines and then decorate as desired.


and from the side...


If you are of the big is better inclination you can make this 21cm by 29cm. Half way pint on the long sides would be 14.5cm and 10.5cm on the short sides. Measurements on middle line and at far right from bottom edge up would be 4.5cm, 2cm, 4cm, 4cm, and then 6cm. This would leave a 8.5cm space at top right. Cut and fold in same manner.
Off to look for Fairy's in my secret garden LOL
hugs
Annette In Oz

Tuesday, June 18, 2013

Ribbon Slider Card / Tipnique Tuesday

Oh dear. I nearly forgot what day it is as I have my daughter and her boyfriend here visiting from Adelaide which has been awesome and time with them will go way too fast!! Anyway Tuesday it is and today I'll share how to make a card where you pull a ribbon to make an element move across the card. This technique from my old tips and techniques book was written in my hand writing so I'm not sure of its origin :o)

                                                RIBBON SLIDER CARD

                 MATERIALS

  • A4 card stock
  • Stamps of choice. Some for background and one main image. Using images that "fly" such as birds, angels, butterflies etc go well with this card.
  • Coloured card stock for matting and card base.
  • Black ink pad of choice.
  • Colouring medium of choice.
  • Ribbon and two beads with hole big enough for ribbon to go thru.
  • Craft knife, craft mat, pencil, rubber, ruler, scissors, black or dark grey marker and glue or thin double sided tape.
                  HOW TOO

1) Stamp images on background and main focal image or use a pre printed photo image as I have done for the blue butterfly. Colour images and back ground as desired. Trim main image with scissors around outline. I'm using a printed butterfly as my flying image. Edge main image with black or dark grey marker. Cut background to desired size.


2) Work out in which direction you want the main image to move such as up/down, side to side or along an edge. I've decided mine will go from one corner diagonally to the other corner. Lightly mark two side by side lines with a pencil, along area you want the image to move along but leave a 1cm space at either end of both lines. That is don't cut right to the edge of the card!. Use craft knife and ruler and cut along the marked lines. This is the slide bar and will have the image at front and ribbon at make. Width of the bar depends on size of your flying image. Width has to be slightly smaller then the width of the image.


 Cut another small slit side on to the slide bar and a few mm from the first two lines at either end. It has to be wide enough for the ribbon to fit thru. You can make the ribbon come out at the edge of the card without this extra little slit but it makes the card lift up at edges with repeated use of the ribbon slide mechanism.


3) Cut one to two thin strips of scrap card to make the slide tabs. Trim so they are just long enough to fit under the slide bar and overlap on top.


The slide tabs need to fit loosely over the slide bar and not be a firm fit so they can move up and down the bar. You will only need one slide tab for a small image and two for larger images. Test spacing of the slide tabs by placing image on top and ensuring the slide tabs can't be seen underneath.

4) Glue the tab in place by placing glue on the overlap of the tab and NOT on the slide bar.


Glue image on top of the overlap area of the slide tab and NOT onto the slide bar.


5) Use ribbon slightly smaller in width to the slide bar. Cut ribbon to twice the length of the slide bar. Turn card over to back with slide tab in middle of the slide bar. Find centre of ribbon. Apply glue ONLY to rear of slide tab NOT on slide bar and adhere centre ribbon in place on slide tab. Poke ends of ribbon thru side on slit in front of ends of slide bar so they come out at front.


 6) Apply glue all over back of card but not near slide bar, on ribbon or on side on slits. I've shaded the area to be glued on mine so you can see where the glue will go.


7) Glue card to base card. Attach a bead to each end of the ribbon. Do this by pulling image all the way to one end of the slide bar and attach bead to that end. Trim excess ribbon off. Pull ribbon/image to other end and repeat this. Add words of choice and card is complete. Pull ribbon to make the image move across the card.


The beads stop you accidentally pulling the ribbon all the way thru. I seem to have kept allot of construction type card techniques as I've always loved adding movement or interest to my prioects. The thing with these cards is they are actually far more easy to make then what they look. You just have to follow the instructions word for word :o)
hugs
Annette In Oz 

Tuesday, June 11, 2013

Make Your Own Dye Ink/Embossing Ink (Tipnique Tuesday)

This week I am in another state visiting my gorgeous Mum and other family. I didn't bring my old tips /techniques book with me but grabbed some papers from my book that I had marked with "Make Your Own". Instead of a card this week I'll share a few of the" make your own" tips :o)

            MAKE YOUR OWN DYE INKS
  • Baby food jar or old film canister
  • Rit powdered dyes in chosen colours
  • Rubbing alcohol-Isocol available in Woolworths supermarket or other
Baby food jar: Add entire packet of powdered dye to the jar. Add rubbing alcohol till it fills to the top of the jar. Replace the lid and shake.
Film canister: Fill canister 1/4 way full of powdered dye. Add rubbing alcohol to fill to top. Replace the lid and shake.
Mix colours to make custom colours. Use ink on a blank ink pad or make an ink pad from Cut N Dry felt such as the one sold by Darkroom Door. Use some of your made dye inks watered down in spray bottles to make your own spray inks. Add mica powders to your spray inks to make your own shimmer mists!

            MAKE YOUR OWN EMBOSSING INKS
  • Powdered clothes dye. Any colour or brand
  • 1/4 teaspoon rubbing alcohol
  • 5 tablespoons Glycerine
Mix dye powder with rubbing alcohol to the consistency of thin cream. Add glycerine and stir till well blended. This amount makes enough to replenish a stamp pad several times. This makes a coloured embossing ink.

To make a clear embossing fluid another recipe says to mix 1 part glycerine to 1 part water. Pour this on your stamp pad.

When re-inking a stamp pad pour on the re-inker fluid over the pad and massage the ink into the pad using the end of a pen.

Hugs
Annette In Oz

Wednesday, June 5, 2013

Featuring Magazine-my desk is in there LOL


Hi all
I'm in Queensland visiting my Mum so can't join in WOYWW this week. Thru "What's On Your Workbench Wednesday" (WOYWW) run each week under the guidance of Julia Dunnit I met Marit. Marit is an artist and she is also the founder and editor in chief of a new to me magazine called Featuring HERE. Marit approached Julie to do a segment on WOYWW and then Marit asked some of us to submit pictures of our desks. I'm chuffed to say mine is in the magazine!!


It looks like an amazing magazine and as soon as hubby gets paid this week I'll be pre ordering one for myself. I'm excited and thanks so much Julie for hosting WOYWW and Marit for asking me to join in for your magazine!
hugs
Annette In Oz  xxxx


Tuesday, June 4, 2013

Never Ending card / Tipnique Tuesday

Tuesdays tip/technique this week brings back memories as it was one of my kids favorites. It's a card that is interactive and bends endlessly over and over. Hence why it is called an Never Ending Card.

                  MATERIALS

  • A4 card stock
  • Pencil, rubber, ruler, glue, bone folder and craft mat
  • Stamps or images and colour medium, ink etc of your choice

                   HOW TOO
1) Cut two pieces of card from A4 card stock to measure 14cm by 10cm. Cut one of these pieces in half long wise so you have two long pieces measuring 14cm by 5cms..


On these two pieces score at 3.5cm from either end. I have marked mine with pen so you can see exactly what to do. This will leave a 7cm section in the middle.


2) Cut second large piece in half crosswise to create two 10cm by 7cm pieces.


On these two pieces score across at 2.5cm from each side. You will have a 5cm section in the middle.


3) On the two long sections measure and mark a dot on each short end at 2.5cms. Line ruler up across from end to end and draw a light line down to the score line. Mark a light "X" on each corner


4) Bend all four pieces on score lines forward and backward and press along folds with bone folder as you bend in each direction.

5) Have other two pieces in landscape position with middle close together. Mark a light "X" on each corner. On one long piece apply glue in both corners marked with "X"'s as shown.


Attach with "X''s together as shown. Repeat to the other piece


Now decorate as desired and bend to your hearts content


Here is a little video to show you how it bends. At end are some links to other ones people have decorated.


I wont decorate mine this week as I have not got enough time. I'm off to visit my Mum for a week and need to pack! If you want a bigger version just double all measurements.
hugs
Annette In Oz

LinkWithin

Related Posts Plugin for WordPress, Blogger...