Tuesday, October 6, 2015

Christmas House Decorations-How Too/Tipnique Tuesday

I stopped doing a Tuesday how too when I needed shoulder surgery and then had on going post op complications. Well today is Tuesday and I have been spending my days off making little Christmas house decorations for my family. My Mum made them for me many many years ago and now I wanted to make them for my children, their partners and my grand daughter. So I took some photos as I made a batch today to share the how too with you all.


STEP ONE-WHAT YOU NEED

  • Cardboard. Don't use mat board as its to hard to cut allot at once. I used the cardboard behind a writing pad.
  • Pencil
  • Scissors and/or cutting knife
  • Ruler
  • Hole punch
  • Awl
  • Match box. Either use a real match box or some blank ones from the dollar store that are a match box with no matches in them. Mine is 5cm long, 3.5cm wide and 1.5cm deep. YOU WILL need to adjust your measurements if yours are different to this!!! 
  • White gesso-optional
Measure and mark out a rectangle that is 8.5cms by 6.5cms and a smaller one that is 7cms by 5cms. Adjust this smaller size as needed if your match boxes are a different size to mine. This smaller rectangle will be the two end parts. The larger rectangle will be the roof.


Cut out both using the ruler and craft knife. Place both rectangles in the landscape position. On the larger rectangle mark the half way point at 4.25cms along the top and bottom of the 8.5cm edge. Rule a line across. Use the rear of the craft knife and the ruler to score along this line.


Turn the rectangle to portrait position. On the centre line mark a dot half way along at 3.25cms. Punch a hole at this dot.


On the smaller rectangle, measure and mark a dot at 3.5cms which is the half way point at top and bottom and rule a line. Measure and mark at dot at left, centre and at right 1.8cm up from bottom. At the top mark a dot at 1.75cms from the left side and from the centre line


Use ruler and pencil and draw a line down from the top 1.75cm marks to the 1.8cm marks on either side. 


Repeat to second half. It should look like this...


Use craft knife and ruler to cut out the shapes. You now have two ends and a roof!


HINT
1) You can leave the roof unpaited but I found it made the felt covering in the next step look whiter. I just used some white gesso.


2) If you are making more then one house just use the roof and the ends you cut out as your templates for more so you don't have to keep measuring each time.

STEP TWO-WHAT YOU NEED

  • Gel medium (or clear drying glue of choice).
  • Your cut out roof and two ends
  • Match box, 
  • White felt or wadding sheet
  • Little pegs to act as clamps
  • Baking sheet
  • Christmas themed material or paper
  • Rubber bands
  • Ribbon or stretchy string to hang the decorated house with. Mine is about 25cm long.
  • Scissors
Work on a sheet of baking parchment. Use the cut out ends and the match box as templates and cut out enough Christmas material or paper to cover each. Use the roof as a template and cut out enough white felt to cover one side with a 1cm over hang.


Open the match box draw and check it is bottom side down as per picture. This will give your base strength as it will be two layers thick. Push draw back in


Ensure the material or paper is right side down. Place gel medium on all sides of the match box. I just used my finger to do this but you could use a glove of course if you like. Place match box onto the material in landscape position with draw bottom at bottom. Bring over one side and then the other and gently press it onto the match box with your fingers


At one end use your finger to push in both sides of the material toward the middle of the match box end as shown.


Place gel medium on outer edge of one side as per photo below


Pres it down onto the match box on the side where the material has been folded in or what will be the inside or hidden area


Place more gel medium on top of this part as shown.


Now press the other side up and over onto the first glued down part


Repeat to other end so match box is enclosed and all glued areas will be hidden from the outside


Apply gel medium to one end piece. Ensure material or paper is right side down


Press glued side down onto the material or paper. Trim closer to the end shape leaving a 1/2cm over hang with scissors and tapper the bottom corners as shown.


Apply gel medium to over hanging edges and press the material over and down to the rear of the end shape


Repeat to other end so you now have three covered pieces like this....


Apply a generous amount of gel medium to each end of the match box


Press the two end parts on and the wrap an elastic band around the base to hold the ends on while it dries.Put it aside on the baking sheet.


Apply gel medium to the roof piece. If you painted it white apply it on the white side. Press it glue side down on your felt.


Miter the corners with scissors


Apply a generous amount of gel medium to the over hanging felt. Press it over and onto the rear of the roof. Its easier to do a corner at a time then then do the sides. As you stick it down at the corner apply a small peg to hold it in place, repeat to other corners then all sides as per photo below.


Fold your ribbon or stretchy string in half and decide what length you want it to hang from the roof. Tie a double knot and trim away excess.


Punch hole thru the hole in the roof  so felt will now have a hole too. Push ribbon or string  thru hole from the back. Gently use awl to push it thru if you need.


Once a little is showing thru at the front pull it all the way thru till knot reaches the hole


After ten minutes I usually quickly remove all the pegs and place some baking parchment over the rear and then reattach the pegs again as it stops the pegs being glued to the roof on drying. I wait the ten minutes as its enough for the felt to stay stuck down when you remove and reattach the pegs. Leave this to dry for a few hours.


When completely dry remove the pegs and the baking paper. Bend your roof along the scored line from earlier


Apply gel medium along all upper edges as per photo below.


Lie roof on side and eye ball where to place the base so roof will be evenly overhanging. Gently push base into place and then turn the whole thing upright pressing the other side of the roof in place. Adjust as needed while glue still wet. Hold the roof om with one hand and use the other hand to put elastic band around each end to hold it all tight while it dries.


I use one band on each end and double it over so the second passing holds the side of the roof down like this...

 STEP THREE-WHAT YOU NEED
  • Opal Glitter spray
  • Glitter glue like Kindy Glitz in colours of your choice
  • White Puffy fabric paint
  • Baking parchment
You can of course use your own ideas to decorate your house such as dangling beads from the roof, windows with family images behind them or sewn on elements. The above is simply the list of things I used :)


Use some baking paper to protect the fabric at bottom and spray the roof with glitter spray following the directions on the bottle. Spray one side then the other.


Decorate the roof with glitter glue as desired. I wrote the names of my family members


Lastly I applied the puffy paint along the house edges at the bottom and while still wet I sprinkled on some glitter as my artificial glistening snow


Here are all my houses at various staged of completion.


I think I'll make a steam punk house for myself...just because I can LOL

Hugs
Annette In Oz

Friday, July 17, 2015

Hello Bloggers!!! It's been awhile

Hi every one...sorry I fell off the face of the internet World for awhile....I had no idea it had been so long since I blogged. It was unintentional. Life got busy plus I had little time to be creative to have anything to share with anyone.

It started with me getting a job at last out of nursing. I'm now Mrs Deli Delights lady in Coles Port Douglas. The money isn't as good of course and I have allot more hours at work but strangely enough I am REALLY enjoying it! Port Douglas is a tourist town with access to The Great Barrier Reef etc...it's high tourist time now and insanely busy in the Deli but still compared to nursing the stress levels are low working there...heck the only thing I have to worry about resuscitating is a dry chicken breast. My work mates are awesome as are most customers...just the odd few I'd like to lob a ham hock at their heads. Every job has those types of customers though....but please folks don't be one of them!

The other thing that has caused my absence in blog land is spammers sending up to 50 comments a day at times...so I decided to change all my security settings (sorry if you dislike having to do a capture thing to send me a comment)...and at the same time refrain from blogging for a month or so to see if it all settled down....then forgot I had a blog at all LOL...well till Neet came asking if I was Ok. Thanks Neet you have reminded me now to blog again :)

Unfortunately hubby Grant and son Tim still haven't secured full time local work so I work any shift I can get which hasn't left much time to get arty farty in my time off. I could never be totally non creative so yes I have done a little here and there but for the most part I haven't taken photos or shared what I have made. My Deli line manager did let me have every Thursday off for a period of time so I could do another course at Douglas Arts Base...this was an introduction to Acrylic paint. It was so interesting and I am finally finding more confidence is my painting attempts....they are a far more forgiving medium then I thought! Some attempts are poop and others I think I am doing Ok with...like everything though it is practice practice practice that is the trick.

As I said I haven't been taking lots of photos but here are a few things I did take photos off that I have done...

A face sketch done while reading Jane Davenports instruction book on  "Drawing and Painting Beautiful Faces


Then in acrylics class we had to quickly do a collage by tearing up papers, tissue paper and magazine images, stick them down and then use acrylic paint to turn it into something else...this was my end result on an A3 300gm piece of cartridge paper!


A week later we then had to PAINT the collage on a large canvas using just acrylic paint...of course it couldn't look exactly like the original and mine certainly doesn't but it was an interesting challenge. The painting is on a 70x50cm canvas. The original paper and acrylic A3 collage is at the right.


Another exercise was to try and paint like a well known artist!!! We were all given a different artist to try and copy as a way of making us work out how we may apply paint for different effect. Holly crap that scared me but I liked my end result. My painting was a rendition of "Shoalhaven" by Arthur Boyd. This is my attempt...you can Google the original


Class has finished now and I still have two painting to complete. One is a landscape but the one I am currently slowly working on is a still life...it was composed and set up by the teacher so really not what I would have chosen to paint but its very challenging just the same. The scene the teacher set up is on the photo at right...it has drapes and see thru bloomin glass.


I decided to tackle the see thru glass parts first...slowly slowly getting there LOL


I've just started to get some more jewellery made too. I became very unhappy re making and selling my jewellery and stopped making any! I had taken it all to a hand made store locally to see if it would sell and had allot of stuff go missing or not be paid for....it really put me off doing anymore till just recently. I've really missed making things though and have started to yearn to be creative again. Lets hope I remember to blog any arty adventures again from now on too!

Other then Neet another thing has spurred me back to reality and my creative blog world and that was hearing of the sad passing of another creative friend Eliza Harms. Eliza was well known in my art circle and was only in her early 50's. I do not know how she died just that it shocked me and many others. I had known Eliza for many years on line and she had helped me get numerous arty things that I couldn't get in my part of Oz...we had been friends enough to phone each other on and off and talk for hours when we did.

Eliza was only ever kind, welcoming and helpful to me and many others...a strong larger then life lady with a passion for making art. She even let me stay with her for four days a few years back after picking me up at the airport at midnight and both of us realizing I had booked the dodgiest hotel in town. I got to share her crazy busy life and spend hours in her truly amazing art space...me a stranger that needed help and was far from home taken in to be cared for and made welcome in her home!! That was Eliza and I will miss her. My deepest condolences go to her family Ross, Myrene and Michael and her many many friends. Life is too short...seize the time you have to do what makes you happy!!

Big hugs
Annette In Oz xxx

Wednesday, October 29, 2014

What's On Your Workdesk Wednesday 282 (WOYWW)

OMG the weeks have flown past...had a few stressful weeks as well trying to do a course, look for a job plus a some family issues to sort out and another wonderful visit from my gorgeous 82 yr old Mum so I missed WOYWW yet again for a few weeks. TODAY I am in my art room having a play at last...its so relaxing and I miss doing art when life gets too busy and gets in the way. So...happy WOYWW everyone...WOYWW stands for What's On Your Workdesk Wednesday and every Wednesday arty folk all over the World share what is on their desks. If you would like to join in or know about go to Julia Dunnit's blog here

This is my desk today...it's strewn with some VERY happy mail that came for me from two lovely arty friends. I'm slowly finding it all new homes :o)


On the left I received an amazing care package of art goods from Rockin Robin in the USA. There is an A4 Geli plate!!!!!!! (I nearly died when I saw that LOL), a little Maya Road canvas book, lots of wonderful metal bezels and metal steam punk jewellery components and a Inkadinkado Delux Stamp Gear set with 16 stamps!! It was all totally unexpected and nearly made me cry...I really have to go to the USA and meet Robin one day...thank you again Robin!


Robin sent me this card too...


In the middle of my desk are some yummy large and small cogs plus silver tape that Eliza has sent me plus the gorgeous tag she made that came too. I adore all that is steam punk and I really appreciated this gift...thanks Eliza MWAH


Lastly on the right are some Christmas cards I have started to make. I've always put them off and ended up in a mad rush to make them in the final week before Christmas so I thought I would surprise myself and get them done early this year!! Once I have the new stash put away I shall spread out and get the production line going....well that's the plan anyway LOL


BIG NEWS FOR ME....I finally got a job!...I had been trying for 7 months or so. It was hard as I decided to not be a nurse anymore after 30 years of being one. I start tomorrow at Coles in the deli. It's a large super market chain here in OZ...I'm nervous and excited. I'm part time so I should still have enough time off to do art and I am so happy about that. Perhaps I can make arty things with the sliced meat at the Deli LOL....Anyway I am off to spy on some desks for WOYWW. Thanks for dropping by
hugs
Annette In Oz

Wednesday, October 8, 2014

What's On Your Workbench Wednesday (WOYWW) 279

Hello all you desk hoppers. It's time for WOYWW where by arty folks around the World share what is on their desks each Wednesday. If you want to join in or read about it go here to Julia's blog. I missed a few weeks again  as life got in the way and I forgot but here is my desk today.


At the left is a recently done abstract painting of the ocean, rocks and sky. This was made as part of my weekly art classes at a local gallery. The process to getting the end result is in a post below this one. In front of the painting I am making "grided viewers" to more actually sketch what I want to try and paint.


On the right I am making a small beaded purse shaped necklace to hold a few coins for when I am caught short buying something.


Just "missed" still being on my desk was a 12 page mixed media book I made using fabric as its base. It's now on display at the council chambers building with other students work. You can see it on a previous post though if you want here. Time to scoot off and spy on what's on other peoples desks!

hugs
Annette In Oz

Tuesday, October 7, 2014

Abstract Painting

I'm  slowly learning about the principals of design, colour theory and how Acrylic paints work. In the last two weeks in class we did the process to creating an abstract painting. We used a previously created abstract of our own. I decided to use this page from my art lessons book. It was made using a palette knife to quickly put paint on the page and then I folded the page in half to create this glorious mess.


I then used a small  6cm square "view finder" to find a section I found pleasing.


Then I had to paint that section onto a 30cm square canvas...it didn't have to be an exact copy more of a hint of it. Once that was done we tried to make some sense of what we had painted and turn it into an abstract vision of something using thin washes of colour. I thought mine looked like rocks and waves so I dry brushed white on the black areas to knock the colour back. The rock in the middle I decided was in the distance on the horizon line so it had a white wash put on it to make it look further away. Lastly washes of Pthalo blue, Cadmium yellow and Magenta were randomly added to knock back the white areas.


The image above was taken with the camera flash off and one below flash on


I can't say I get abstract but I really enjoyed the process and I actually don't mind the end result which is pretty amazing for me LOL.

Oh goodness. I was just looking at the original abstract in my book and now I see a Man In My Moosh with a map of Australia around his legs


and also a stylized praying mantis viewed from under a glass table?....hhhmmm I think I need medication LOL


hugs
Annette In Oz

Monday, October 6, 2014

Fabric Art Book-Experimenting with textiles and transfers

I have just completed a 10 week experimental textiles course held at Douglas Art Base in Mossman.. It reignited my love of mixed media and I used up loads of my stash. In today's post I'll show you a 12 page mixed media fabric base book full of all sorts of transfers and a mixed media fabric wall hanging.

The book is called "Art House" and the pages are fabric that I have attached to Vliesofix (double sided heat bondable stuff) and then to Vilene (stiffening). That gave me a firm fabric base to alter. Each page was then encased in Opals Embossing Enamels (Large grained thick embossing powders) by sprinkling on the Opals over the fabric page, cover it with Gladbake and then iron it to melt it into the fabric. This gave me gorgeous glass like pages that I could hand sew thru, cut, sew with a sewing machine etc etc. I cut all my pages into a house shape and began decorating them. This is the front-

The face is friendly plastic that I melted into a Krafty Lady mold. The shiny fibers are Angelina fibers. It reads "Hope and memory have only one child and her name is art". I hand coloured the trim.


The second page used Angelina film and fibers plus some foiled lattice glue stuff. Quote reads "It's not what you look at that matters it's what you see" by Henry David Taoreau. You can openb the door to the little glass house in the centre.


The red oriental page has an Inkjet Water transfer to Calico.  The quote reads "The very word "Geisha" means artist and to be a Geisha is to be judged as a moving work of art".  The tiny paper Kimono was made by me. The green side is an Inkjet printed water slide decal transferred to material. It's quote reads "The pebble in the brook secretly thinks itself a precious stone".


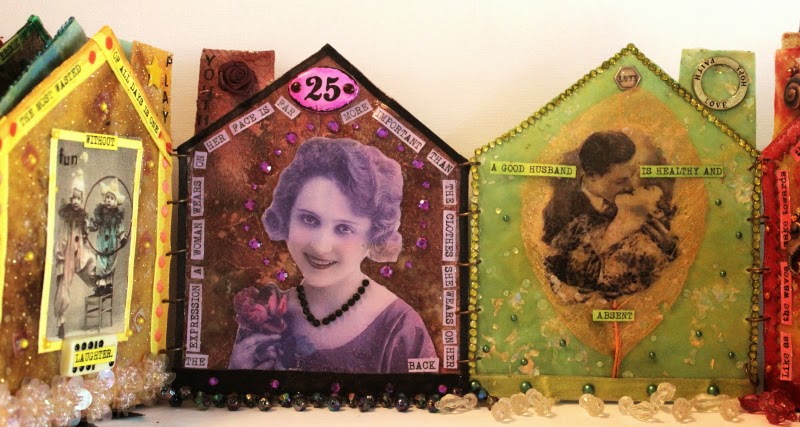
Blue and lemon page features a Translucent Liquid Sculpey transfer of vintage children onto organza. The quote reads "Family is not an important thing. It's everything" by Michael J Fox. Yellow page next to that has a vintage image of children inkjet printed directly onto Calico that had been treated with Inkjet Set. Quote reads "The most wasted of all days is one without laughter".


Next is a purplish page with a gorgeous vintage image that had been printed onto glossy photo paper with my inkjet printer and transferred to water colour paper using Isocol rubbing alcohol. The quote reads "The expression a woman wears on her face is far more important than the clothes she wears on her back". Green page next to that has a Toner printed image transferred to a skeleton leaf using Opals embossing enamel clear (Franklin) and an iron. ( A heat transfer of sorts). The quote reads "A good husband is healthy and absent"...I like that one LOL.


I have allot of vintage bathing beauty vintage images so they had to have a double spread too. Red one at left is a colour toner printed image transferred to material using Omni Gel medium. The quote reads "Like as the waves make toward the pebbled shore so do our minutes hasten to their end" by William Shakespeare. Beach Beauty page at right is a toner printed image transferred to cold laminate and then attached to material. I used a real shell part at the top and the quote reads "Miami is where Neon goes to die".


These are the last two pages...well maybe LOL. Blue page has a toner printed image transferred to material using Elmer's Caulk. Quote reads "The man who has no imagination has no wings" by Muhhamad Ali. Final green page features a toner printed image transferred using a Walnut Hollow heat transfer tool. Quote reads "Dance is the hidden language of the soul of the body" by Martha Graham.


Lastly I made a mixed media fabric wall hanging. It has material that has been stamped on, geli printed on, put thru an embellishing machine, solar printed etc The image is a toner printed one transferred to material with Elmer's Caulk.


There was a little bag too but I forgot to photograph it before all items went on display at the Mossman council building so I' ll upload photos at a later time. To read about how I did the transfers I used look here where I did a post regarding them.

hugs

Annette In Oz

Wednesday, September 10, 2014

What's On Your Workbench Wednesday 275-Fabric Dyeing In The Sun

It's time to play What's on Your Workdesk Wednesday (WOYWW) and its simply a group of creators and artists from all over the World, whom post pictures of what is on their work desks each Wednesday. The ring leader(founder) and where you put the link to your post is on Julia's blog here. I hadn't joined for ages due to various things but as I decided to get creative today I decided to join in!

My knee has been slow to heal and had laid me up for the last ten days after a small operation. The last three days my ability to bend my knee has returned...well enough to do some things but not others...still I'm happy to be moving more freely with less pain. It's coincided with the weather here being so beautiful at the moment. Long sunny days and big blue skies. 

So today I decided to try some fabric dyeing. We have been doing some in the fibre arts class I am doing at the moment but I hadn't tried any at home yet till today. I had some Dala sun colour paints for many years and had never opened them till now. These are very vibrant fabric paints that react to sunlight. I wet the fabric, randomly squirted the paints around and then placed stencils, masks and even plastic faux lace tablecloth on top and left them in the sun to dry. Once dried I took off the items and heat set them in the dryer before putting thru a cold water rinse cycle in the washing machine. I really loved how the T shirt worked out...


These next two I did the same thing but I used prepared for dyeing calico


The last few items I ground up some seeds from this ?African plant below


Then I mixed in alcohol to make a runny dye and this is what the colour came out. I used the lace strips to soak up the last bits of dye.


It's been a fun day and I think I shall be doing more dyeing soon! Now though its time to see what's on other peoples desks around the World. Oh and if you would like to see some photos from my local area here in Oz (I live in World Heritage listed wet tropics) look below as I did allot of sight seeing while hosting Flat Susan for a month for Neet.
hugs
Annette In Oz

LinkWithin

Related Posts Plugin for WordPress, Blogger...